


Hey Y'all! I have had requests for some tastey diabetic recipes, so I am going to break a cardinal rule here.... I HAVE NOT tried this recipe yet! But... I have every intention to in the next week, so I figured we could all try it together! It sounds good! I might skip the raisins... just because they are not my favorite, but I am thinkin dried apples, pineapple, or apricots would be yummy, or mango! I have purchased dried mango at walmart before! :) yum... yes definately mango, like a tropical bread! I think i may skip the nuts as well, but i do like pecans, so I may just make two loaves! :) I hope this is good!!!! ( From Cooks.com )
SUGARLESS BANANA ORANGE BREAD (DIABETIC)
You Need:
2 c. flour
1 tsp. soda
1 tsp. baking powder
2 tsp. pumpkin pie spice
2 ripe bananas
1 (6 oz.) can frozen orange juice concentrate
2 eggs
1 tsp. vanilla
1 c. raisins
1 c. pecans
Sift dry ingredients, set aside. Blend orange juice, bananas and eggs. Stir into flour mixture. Add raisins and pecans. Mix until blended. Bake in 9 x 4 inch pan at 350 degrees until done. This recipe contains no sugar, salt or shortening. This is very tasty and unique.
Wednesday, October 19, 2011
Tuesday, October 18, 2011
Whole Wheat Cranberry Chocolate Almond Scones, YUM!!!!

Ok Y'all! Welcome back, I have taken a couple months off to be with my new and AMAZING baby boy! He is 8 weeks old and just the sweetest lil guy in the whole world!! ( YES, I AM biased! Ha ha!) I Love him to pieces!!! But, that little baking bug has been nipping at me for the entire last week! and mmmm mmmm has it given some yumm-a-licious results! Even my husband drooled over these hummers! So good, and yes, scones are dry by nature, but I have to tell ya, these turned out moist as a scone can get, pretty much like a big cookie, yummy! Now you can easily adjust this recips to suit your tastes, I like almonds, craisins, and chocolate, you can do any dried fruit and any nuts and no chocolate if you want, or no nuts, but i would at least throw some dried fruit in there, just makes them taste good, lol! Enjoy my faithful bakers!!! ( and chefs)
You Need:
1 1/2 C. All-purpose flour
1 1/2 C. Whole wheat flour ( I like Wheat Montana Brand for all flours)
1/2 C. Sugar
3 tsp. Baking Powder
1/2 tsp. Baking Soda ( don't mix these two around, ha ha!)
1/2 tsp. Salt
1/2 tsp. Pumpkin Pie Spice or Apple Pie Spice or Nutmeg
3/4 C. COLD Butter ( I let mine sit out for 30 mins on counter so it is a little easier to cut in)
1 egg ( or egg substitute)
1 C. applesauce, Natural unsweetened
1/2 tsp. Vanilla ( or 1 T almond joy, pumpkin pie, or any flavor you choose coffee creamer, liquid)
1 C Chocolate Covered Craisins ( These are hard to find so feel free to use craisins and choc chips half and half) or other dried fruit
Sugar and powdered sugar to sprinkle on top ( a few teaspoons)
1/2 cup almonds, chopped ( or other nut)
You Do:
In a big bowl, mix the two flours, sugar, baking powder and soda, salt, and spices. Cut in ( this means use a pastry cutter or potato masher and roughly mash in the butter to the flour) until it is crumbly. preheat oven to 400 degrees.
make a whole in the center of mixture and add: egg, applesauce, and creamer or vanilla. whip together the liquid then mix it with the rest of the bowl until all ingredients are wet looking, but not smooth, mixture will be goopy and somewhat stiff, like a thick cookie dough. stir in cranberries and chocolate, Now I chopped my almonds in a food processor but feel free to buy them chopped already or sliced, slivered, etc. Stir until evenly distributed.
get a counter top or cutting board and sprinkle with flour.Take a good double handful of the dough and knead it until it is softly covered in flour and smooth in appearance, about 6-8 times or folds. now pat it flat to about and inch to an inch and a half thick, cut out in desired shape with a cookie cutter or knife, I use an oval football shaped cookie cutter, i just like the shape. Traditionally scones are triangular, but who's traditional? ha ha!
Place on ungreased cookie sheet, dust with powdered sugar and sprinkle a pink of white sugar or brown sugars crystals on top. Bake on an ungreased cookie sheet ( Remember, I like air bake pans) for 15-20 mins at 400 degrees until just golden browned.
Friday, August 19, 2011
Sorry for the lag in posting!
So sorry I haven't been posting! It has been a super CRAZY, but A GREAT, crazy month! We have met a birthmother and she is amazing!!! We will have a baby boy next week!!!!!!!! I am sooooo excited beyond words to finally get to be a mommy!!! Praise God! Ok so I promise once we get home and get settled in, I will whip up a boatload of fun new recipes! I promise September will have you fat and happy with all the new food to try :)
Monday, August 8, 2011
MMMM, I am thinking chicken!

Chicken Cordon Bleu
marinated your chicken breast, butterfly them first ( slice in half width wise) marinate in a mix of 1/3 italian dressing, 1/3 water or olive oil, 1/3 sauce mix. Sauce mix is 1/3 sweet chili sauce, 1/3 lime juice, and 1/3 teriaki and a sprinkle of brown sugar) sorry if I just confused the heck out of ya! I tried to make it simple.... LOL! slice some thick provolone, and thicker ham as well. I like the redneck brand ham or cloverdale, but any ham will work. I don't suggest sandwich meat, as it will probably burn on the edges or not tatse as good, it tends to be saltier as well. Marinate for at least 2 hours, but overnight would be better :) . Now you will need some tooth picks, stuff chicken breasts with a slive of cheese and one to two slices of ham, fold chicken over and seal meat/cheese into breast , secure with toothpicks. Try to cover all ham and provolone with chicken, sealed as best as possible to prevent leakage. Grill even ly on a med heat grill for about 10 minutes per side, you may need to breakoff toothpicks at surface of chicken to prvent burning, but I don't find the neccesary. If you like a little more flavior, try spreading just a teaspoon of sweet chili sauce directly on ham inside of chicken breast before sealing, it adds just a hint of sweetness and kick) Now your grilling time may vary depending on hickness of chicken. If you are worried about chicken cooking all thway through amd drying out the outside of breastm simple grill, open butterfly side down for 5 minutes or so before stuffing. it might make it harder to seal the ham and cheese in, but will ensure full cooking of chicken breast. My husband discovered this reciped, made them for dinner, and we loved them! Bon appetite!! Sorry if my postings will be few and far between this month, but we are meeting with a birthmother in two days!!!!! So we will be preoccupied for awhile, as she is due in just two weeks! God is so good, and he is finally saying it is our turn to become parents!! So I suppose I will have to post some baby food recipes on here in a few months, lol!!!!! Can't wait to meet our birthmother and let her become a part of our family!!!! Thanks for being a faithful follower of my food blog!! God Bless! Heather
Friday, July 15, 2011
MMMM!!! Gumbo of The North!

Ok, ok, so I have lived all over the South, but I have lived up North longer.... I still like all the food and alot of the culture of the South! Don't hate me for not being a fan of collard greens, but I've also never had them prepared very well... maybe I'll take a vaction to Lousianna or Georgia or Alabama and get 'em done right! HA! But I do LOVE ME SOME GUMBO!!! And this Montana Girl has made a really good recipe... ok well I think it's good anyways... ha ha ha!!! I made it up. and if someone else does it the same way...sorry! I promise I didn't copy you! So here are the ingredients you will need. Just remember, it's NORTHERN so I don;t have as much fresh available. (Dontcha Know, eh? LOL) OH!! And i love Okra, it really is the key ingredient to gumbo, it is what gives the gumbo the right texture and flavor. If you don't like okra... you probably won't like gumbo, he he he!
YOU NEED:
1 bag frozen Okra ( fresh if you have it and want to use it I suppose)
1 bag frozen Okra ( fresh if you have it and want to use it I suppose)
Baby Sweet Peppers ( 3 orange, 2 yellow, 2 red) or half of a big pepper of each color.
1 cup frozen Lima beans (More if you like them alot)
a handful or two of frozen sweet corn
1 can diced tomatoes (or fresh)
1 small can (really small, the 70 cent ones) diced green chilles
1 small can tomatoe sauce
1 lb (up to 2 lb, depending on how big your pot is) Pork country ribs or loin, chopped into bite
size chunks
1/3 cup flour
1 small purple/red onion copped into larger slices
1 cup strong beef, pork, or chicen broth
Garlic Powder, or fresh garlic ( I use alot, like 2 or 3 tablespoons, you use how much you like)
Black Pepper (several strong shakes, or fresh ground to taste)
Cajun Seasoning ( about 1/2 teaspoon to 1 teaspoon, but you can add more or less depedning on your tatses)
salt to taste
Olive Oil
Heat large kettle (dutch oven or soup kettle) with a couple tablespoons of olive oil, add chopped meat and brown well, until cooked through. about halfway through cooking add flour and stir briskly to coat meat. add chilles and stir, let cook a minute or two. Add seasonings and stir well. Add onion and peppers. cook a few minutes. Add tomatoes, tomatoe sauce, and taste, add more seasonings if needed. Add broth and remaining veggies. stir well and every so often. cook a minimum or 30 minutes, but can cook longer if time allows!( like stew, cook longer or shorter as time allows haha!) Serve over rice or alone, I personally think it would be good with kneophla or chewy dumpling noodles :) But I didn't try it yet ha ha!
crusty rolls would be good too! You could use chicken or beef I suppose as well. Of course, I do like gator! hehe! Enjoy!!!
Tuesday, July 12, 2011
pina colada cake

Hello Friends! Ok, so I have never, yes, NEVER made a homeade cake from scratch until this last week!!!!! It turned out to be so so so so yummy!!!! My husband ate almost the whole thing... ha ha ha! I got two pieces.. but they were exceptional! I halfways made this up and half ways am pretty sure someone else has already tried it! ha!!! Well, I like to think I made it up...even though I am more than likely wrong, I will still pretend I made it up, ha!!
ok so i took the yellow cake recipe from Better homes and gardens, but changed it just a little.
Cake:
Yellow Cake
Ingredients
2-1/2 cups all-purpose flour
3-1/2 teaspoons baking powder
1/2 teaspoon salt
2/3 cup butter or margarine, softened
1-3/4 cups sugar
1/2 teaspoons vanilla
1/2 teaspoon rum extract
1 tablespoon coconut extract
2 eggs
3/4 cups milk
1/2 cups pineapple juice, mixed with the milk to make it sour
1 box coconut cream pudding (jello brand)
directions
1. Grease and lightly flour two 8x1-1/2-inch or 9x1-1/2-inch round baking pans, set pan(s) aside. Combine flour, baking powder, and salt; set aside.
2. In a large mixing bowl beat butter or margarine with an electric mixer on medium to high speed for 30 seconds. Add sugar and vanilla; beat until well combined. Add eggs, one at a time, beating 1 minute after each. Add dry mixture, including pudding and milk/juice combo alternately to beaten mixture, beating on low speed after each addition just till combined. Pour batter into the prepared pan(s).
3. Bake in a 375 degree F oven for 30 to 35 minutes or until a wooden toothpick comes out clean. Cool layer cakes in pans on wire racks for 10 minutes. Remove layer cakes from pans. Cool thoroughly on racks. Just so you know, My cake took almost an hour for some reason, so allow possibly an hour for this to bake!
Ok, so now is the fun part!!! The filling!!!
you need:
3/4 can pineapple tidbits, crushed or chopped by hand , just slightly ( I mashed them in the pan with a potatoe masher a little bit)
1/2-3/4 cup brownsugar
1 tablespoon rum extract
1 tablespoon coconut extract
white sugar to taste ( about a tablespoon or so)
1 tablespoon butter
dash of salt
combine all ingredients, bring to a rapid boil, turn heat down and simmer until fruit carmelizes and becomes opaque ( slightly see-thru) add more sugar if fruit is not getting a medium thick carmel consistancy. This will be the fruit filling layer between the cakes and needs to be thick enough to not run. after carmelly and clearish... set aside to let cool while you take out the cakes to cool. I immediately removed cakes from pans by flipping them over and let cool on a clean towel. This way they cool faster and are flat on both sides.
TO COMBINE CAKE
I admit i bought some cream cheese frosting.... it tatsed like crud! haha! Find a good cream cheese recipe and make your own. LOL! Anyways instead of frosting between your layers, use fruit instead of frosting, cover entire outside of layer with cream cheese frosting and top with a cute flower or similar decoration. ENJOY!!!
Avacado Grape Salsa
Sorry everyone that I took the month of June off! It was way too beyond busy! I suppose I should have told you all that so that you wouldn't have to keep checking in :) . Anyways, My husband found this recipe and made it for the 4th of July, we added jalepenos for fun and it was a super hit!!! It is a little sweet to eat too much at once, but it is great on tortilla chips or in a beef steak wrap! YUM!
Ingredien
 ts
ts2 cups seedless red grapes, chopped
2 avocado - peeled, pitted and diced
1/4 cup finely chopped red bell pepper
1/4 cup finely chopped yellow bell pepper
1/4 cup finely chopped sweet onion
2 tablespoons chopped fresh cilantro
2 tablespoons lime juice and a hint of the zest
1 teaspoon garlic powder
a dash of salt
1 pinch ground black pepper
Directions
Chop grapes in food processor for a few seconds, puree avacado in processor ( or mash well in bag) Place the grapes, avocado, red pepper, yellow pepper, onion, and cilantro in a mixing bowl. Season with lime juice, garlic powder, and black pepper. Gently fold the ingredients together until well mixed. Refrigerate 30 minutes before serving. This will only stay good for a few days as avacado doesn't last all that long. ENJOY!
I suppose you could use fresh garlic too, however, it's so yummy anyway you tweak it!
Monday, June 20, 2011
Grilled Peanut Butter/Banana and Yogurt!

Yum! Ok this might sound nasty, but it is so good! My daycare kids devoured these sandwiches! We were gonna make stuffed french toast, but this is my egg free version, mmmm!
You need:
Bread
Peanut Butter
Banana slices
butter or margarine
vanilla yogurt
To Do:
Spread generous amount of peanut butter on both sides of bread. Layer thin banana slices on one piece of bread. Put sandwich together and butter both exposed sides of bread, grill in a heated skillet as you would a grilled cheese. Make sure both sides are golden brown. put some yogurt on your plate, slice sandwich in half, dip in yogurt if desired or eat separately. mmmm! Makes a good treat for breakfast or a snack anytime! Have fun!!!
Sunday, June 5, 2011
Chicken and Rice with aTwist of India

I know you have all had chicken and rice, or cheesy chicken and rice, it seems like an old fashioned staple in most areas of the country. I prefer to use fresh ingredients and real ingredients. I am not a huge fan of processed foods, however I try to adapt my recipes so that they can use either grade of ingredients in case some of you like them. I love Indian, Thai, and Japanese food. I like Italian and German food too, ha ha, ok so there isn't much that I don't like, except any form of seafood! ANY! I know most people enjoy it though, so I will be sharing some seafood recipes in the future. Today I will be sharing a classic dish with an Indian twist.
Alot of food that is considered from India contains certain spices that are harder to find in smaller ares like my rural town. Often you can make the spice mixtures at home. This recipe is easy and I was able to find all of the spices at our small grocery store with ease. I fed it to my daycare kids and they loved it, my five year told me that the kitchen smelled so good and it was making him hungry! Ha ha!
You Need:
2-3 cups cooked rice ( I use jasmine rice, it is sticky, tender and has a sweet aromatic flavor)
1/2 lb boneless skinless chicken breasts ( use a full pound if you like more meaty dishes)
1 1/2 C - 2 cups milk (use your judgement, if your sauce is too thick add more)
1 cup frozen peas or sugar snap peas
salt and pepper to taste
3/4 C - 1 cup shredded cheddar cheese or about 1/2 cup cubed velveeta. (velveeta will make this dish sweeter for some reason and not as easy to reheat later, but it works)
1 teaspoon each of the following spices: yellow curry, cumin, corriander, garlic powder ( or 2 cloves)
2 tablespoons or so olive oil for frying/browning chicken
corn starch
you can use more spices if you taste test it and find you want more... I never measure, I just add until it looks good, so use your taste buds, I like stronger flavors, so my measurements might be more than you like, or less.
To Do: boil chicken in a few inches of water in a covered frying pan for about 10 minutes, flipping halfway through. After sides are white(inside will still be pink) drain chicken and chop or shred meat into tiny bite sized pieces. Add a few drizzles of olive oil to the frying pan ( empty the water first) and add shredded or cut chicken to the pan. tossing until starting to brown. add garlic salt and pepper and stir or toss until all is coated. After a few minutes of cooking, when chicken is almost done, add remaining spices and stir wildly until all is coated evenly. Turn pan off and allow to cool for 5 minutes or so, add milk and stir quickly to warm the milk without curdling. Add peas, turn heat back on to low to heat the milk, as milk is warming mix small amount of milk with cornstarch ( use some and if your sauce isn't as thick as you like, add more.) add cheese then add cornstarch mixture to sauce and stir often until sauce comes to a boil, turn off and keep stirring until sauce is thick and smooth. Add in cooked rice and serve immediately! Enjoy!!!
Thursday, June 2, 2011
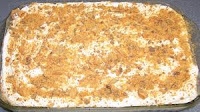
Butterfinger Dessert
This is really good and super easy! It can be made in about 5 minutes if you need a quick dessert for unexpected company, or the "Oops I forgot to cook for the potluck!" moment. If you have the time, this dessert can be made the night before and will really have time to soak together!
 You Need:
2-3 king sized Butterfingers
1 small tub Cool Whip ( I like the Cool Whip Free style)
1 angel food cake loaf ( Of course homeade is better if you have time, but store bought is fine too) You can use yellow cake as well, if you have time.
1 Large box vanilla instant pudding, or cook and serve if you have the desire
To Do:
- cube the cake in about 1 inch chunks and fill cake pan with cake pieces
- whip up the pudding and crush the candy bars in a zip loc bag, mix 3/4 of the candy pieces into the pudding
- pour pudding over cake pieces so that all are evenly covered, no need to mix, just let lay on top, it will soak and slide down into place on it's own
- spread cool whip over top to cover entire pan, sprinkle with remaining candy bar pieces
Ta-Da! You are done, now either refridgerate or serve immediately! If you make it the night before, wait to top with cool whip until before serving. This is so yummy and so easy, everyone will ask where you got your idea! ha ha! Have fun!
Note: The easiest way to crush candy bars, to me, is the food processor, but a ziploc will work too. I use a gallon size ziploc, put my candy in, press out the air, seal bag, cover with a piece of wax paper, or paper towel, use a meat mallet, or jelly jar to pound gently on bars. It doesn't take much force, more aim than anything! Good luck!
Super Yummy Grilled Eggplant Parmesian

Ok..for those of you who looked at this title and said...oh yuck!, please rethink that thought and give it a try...even my husband ate this and HE said he wouldn't. He said it looked and sounded gross, but overall, tried it and liked it, not loved, but liked. I LOVED it, as did my best friend, mother in law, and father in law, and whoever else was at the BBQ. Ha ha! Sorry i didn't have a picture of the whole sandwich! I actually saw this on the Food Channel, The Sam the Sandwich Guy Show. He is all about healthy, low fat, lower sodium alternatives to traditional grilling. Everything he cooked is usually on the grill, but not always. We kind of altered this recipe a little, as always, I don't think I have ever cooked anything exactly to recipe, LOL! Anyways, my BFF was up for Memorial Day last year when we saw this show, literally 5 minutes later we were at the store buying the ingredients! If it had been August, we would have picked the ingredients from grandma's garden! This is quite possibly the BEST thing I have ever had on the grill... yes, it even rivals a good rib eye! I have since then adapted the size for appetizers, served full sized as a meal, and simply craved it all winter long!!! ( We had an EXTREMELY long winter this year!) Yes I supped you could use a counter top grill, like a George Foreman, but I don't own one. Ok people, here it is, the Holy Mecca of Sandwiches!!
Grilled Eggplant Parmesan
You Need:
1 medium eggplant. (Should be heavy for their size, not be mushy, if they fell a bit "springy" when gently pressed, they are ripe. Mushy is bad, it will be bitter and seedy)
2 rounded Hot House tomatoes (larger on the vine would be good too, Roma are too small)Fresh Basil Leaves ( Our store had none, so we bought a basil plant from the green house)
FRESH Parmesan cheese, whole or shredded, NOT powdered
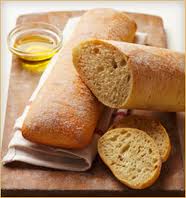 Crusty Bread ( We used LA Brea Bakery Bread, mmm! Baguettes, Ciabatta, Foccacia, or antipasto loaves all work well! Slice thin and at an angle to get maximum size and shape.)
Olive Oil
sea salt and cracked pepper to taste
Some people have used fresh mozzarella in addition to the Parmesan, but I have not tried that yet. I do like fresh mozzarella, however, it is a bit goopy for me.I think I would prefer just the Parmesan. The cool part about this sandwich is that the tomatoes actually caramelize themselves and make a marinara type sauce all on their own! The fresh basil just cannot be beat. I don't know what it is, but it makes for an amazing flavor!!!
To do:

Slice eggplant in 1/4 inch thick slices ( no more than half inch thick), slice tomatoe into equally sized slices ( not more than half inch thick) brush olive oil on both sides of eggplant and tomatoe. sprinkle lightly with sea salt and crushed pepper ( very lightly) . On medium heat grill, cook eggplant on both sides until tender and branded with grill marks, ( a few mins on each side, do not let it mushy.) do the same to the tomatoe slices. For the tomatoes, I like to use one of those mesh like grill grates for veggies, available at grocery stores and walmart. This way they don't accidentally slip into the grill. I like to use a tongs for this sandwich, it is easier, but a spatula will work just fine as well. Slice and toast your ciabatta, or whichever style, bread . a few seconds on the grill on each side usually works, I brush mine lightly with olive oil first. Finally, just before your tomatoes and eggplant are done, grate fresh parm over them while still on the grill. Yes it makes a mess, but it all burns off quickly anyways! as soon as cheese is melting, layer crunchy bread, eggplant, tomatoe, fresh basil leaf or two, then top crunchy bread. TA-DA! Now eat it before it gets cold, you will not be able to have just one! :) Chinese eggplant works well for this too, if sliced at an angle,, but may require two slices per sandwich. ENJOY!!!!
Friday, May 27, 2011
Worldwide!

Tuesday, May 24, 2011
MMM Fruit Pizza... AGK style!

MMM! Doesn't that look just light, yummy, and refreshing! To me, fruit pizza screams summer! I got all of this fruit from the walmart in Miles City (MT.). They have much better produce than our Walmart ( Williston, ND) I guess one is 55 miles away and one is around 100 miles away, so... it's a toss up lol. I like Miles City because we can usually meet our bro and sis in law as it is the half way point between our homes. However, this fruit pizza was for dessert for our mother's day bbq. It tasted as good as it looks!!! I used the air bake pan that my Aunt Donna gave me for Christmas two years ago... I LOVE that pan! Never burns anything... even if you forget about it!! This recipe was super easy and very yummy! I hope you enjoy this, even if you have had it before, each one is different!! Summer is officially here after this Memorial Weekend!!!
Fruit Pizza AGK Style (AGK= Almost Grandma's Kitchen)
You Need:
Mixed variety of fresh fruit. (I would only use mand. oranges or pineapple if I HAD to have canned)
1 package cream cheese(8 oz.)
1 small container cool whip ( I use cool whip free)
brown sugar to taste, probably about 1/4 cup or less
vanilla, 1-2 teaspoon depending on tastes, I like 2
2 teaspoons or so or less lol, just to gently sprinkle on top
Crust:
Sugar Cookie Dough ( make your own, or buy refrigerated, I will post a sugar cut out recipe later, cut out doesn't work as good for this)
First, you need to make your crust in a large, round shape. Don't be afraid of the sugar cookie dough, just work it and roll or press it out in a thin and even round shape. I like the airbake pan because it doesn't burn the crust. Feel free to use a pizza pan. Bake according to your recipe or package instructions.When your crust is golden brown take it out and set it to cool,
While you cookie is cooling, get a blender, food processor, or large bowl with an electric beater. ( I prefer a food processor, it is just easier for me) blend/whip your cream cheese until it is smooth. ( I set my cream cheese out to warm about an hour before I use it.)
add vanilla, and some brown sugar, blend again and taste to see if the sour "bite" has sweetened. Be sure not to make too sweet though, because you will be adding sweet cool whip. start with two or three spoonfuls/pinches. add entire cool whip (smaller sized container). add vanilla as well. you may add orange or lemon crystals ( like "True Lemon" or "True Orange") If you want to add a citrus kind of base. Taste the cream mixture to see if it is sweet enough for your liking. now frost your cookie with a thick layer, thick enough to press the fruit into.
Clean and slice all of your fruits, press into layer or creme, and sprinkle lightly, just dust, with white sugar. chill and slice! Yum! I like strawberries, kiwi, grapes, mango, blueberries, plums, and peaches, but you can use any fruits you'd like! I also have made a veggie pizza using crescent roll crust, ranch herb dip for the creme, and washed, sliced raw veggies, great appetizer or party pleaser! Have fun, guys and be creative!!!!
Sunday, May 22, 2011
Roasted Vidlia Onion Wild Rice
Yes, this sounds yummy, however, we found it quite blah and had to add some watkins chicken broth to it to make it servable.. I was disappointed. However.... I know some people have different tastes than I do, so I will post the recipe as it was given to me and let you make your own opinion. I did add about 1/2 to 3/4 cup strong watkins chicken stock/broth and let it cook in the oven with the sweet potatoes until we were ready to eat. Here is the original recipe ( OH! and I used only 1 onion, and I just cooked them in butter with the fresh garlic chopped ( I doubled the garlic) until clear, then added the rice, instead of roasting the onion)

Wild Rice with Slow Roasted Vidalia Onions
Serving Size: 4 Servings
Ingredients:
2 Large Vidalia Onions, unpeeled
1 Cup Wild Rice
3 1/2 Cups Water
1 1/2 Teaspoons Salt
2 Cloves Garlic, peeled
1 Bay Leaf
4 Tablespoons Butter
To Taste Salt and Pepper
3 Tablespoons Parsley, chopped
Directions:
1. Preheat oven to 350°F. Wrap each onion in aluminum foil. Bake for 3 hours or until tender. Remove onions from foil and peel when cool enough. Coarsely chop; reserve.
2. In saucepan, combine rice, water, salt, garlic and bay leaf. Bring to a boil; reduce to a simmer. Simmer for 40 minutes or until rice is tender. Drain excess water; remove garlic and bay leaf.
3. Over high heat, brown butter. Immediately add rice and onion. Stir until rice mixture is hot and excess water has evaporated. Season with salt and pepper. Garnish with parsley and serve.
Ok, Well, it is 11pm and I need sleep, ha ha! So I will have to post the super delicioso Butterfinger dessert tomorrow! I know some of you have probably had it before, but it was new to me this year. I had it at Easter and oo-la-la! It is a winner, I tell ya! It's for sure a "you'll like it, you betcha" dessert! :) Have a good one y'all and enjoy cooking!!! Heather
Whipped Sweet Potatoe casserole

OOH! COLORED TEXT! HA! Ok, I am a big dork, and just realized this feature! he he! Ok so orange is fitting for the sweet potatoes! I don't like to use canned yams or sweet potatoes unless I have to. I love them fresh. They are packed full of vitamins and other good-for-you stuff, so don't tell the kids they are a veggie! ha ha! Seriously though, they are super healthy! I do add some not so healthy stuff to them, but all in all... not much! I like to cook for a crowd so feel free to cut my recipes in half, or whatever works for ya!
This dish is light and airy, but not calorie free by any means. You could use substitutions I suppose, and it would prob turn out just as good.
My husband loved these so much he ate the entire bag of left overs... cold...ugh! I can't do cold starches... I am a texture eater! HA! Oh well, he cracks me up! You would have swore I made candied yams! LOL. Surprisingly these have little sugar in them. I used the Emerald brand Pecan Pie Glazed Pecans, but any glazed or candied pecan would work, as well as plain pecans tossed on med heat with some brown sugar, cinnamon, and a spoonful of water until they were "glazed". but when cooking a meal this big... I don't glaze my own pecans! haha!
You Need:
6 Sweet potatoes (mid size range) or mix of sweet potatoes and yams. (the brighter colored orange are the sweet potatoes, the yams are yellow-er. Well Really, they are both sweet potatoes, just 2 different varieties and yams are actually a south american tropical tuber that can be up to 7 FEET in length and we don't TRULY have them here, but that's a whole other story, ha ha!) ok, start over, LOL!
5-6 mid size sweet potatoes, washed and peeled ( I know, I usually like to leave peels on, but these are very tough and thick, so we need to peel them) cut into chunks
just enough water in the pan to almost cover the chunked sweet potatoes
a pinch of salt ( to help bring the water to a boil)
3 T butter (Margarine would work, but will not be as good of consistency)
about 1/4 to 1/2 C brown sugar, reserve some to sprinkle on top
a smidgen of ground fresh or dried nutmeg ( just to very gently sprinkle on top)
1 package (about 3/4 Cup) Emerald Pecan Pie Glazed Pecans (or what I explained above)
1/2 C to 3/4 C heavy whipping cream ( not cool whip- like the cream you can drink)
2 egg whites
Okie Dokie...soooo boil the sweets until tender ( I cover mine and stir occasionally to prevent sticking) then drain them ( I know, seems a waste to drain that vitamin filled water! Feel free to save it for a soup or to cool and water plants with... or use it to cook your rice in) mash them with your spoon or fork just to get them started. Now... add the butter, salt and pepper to taste ( I like pepper alot) Now you can whip them with the electric mixer, or if you don't have one, just whip them good with your masher or sturdy whisk. Whip until creamy and smooth with no chunks, slowly adding your cream as you whip ( about 1 minute should do the trick) now if you want them thicker add a 1/2 C cream, up to 3/4 C to make them the consistency your family desires. ( I used a full cup and it was too much, I would use 3/4 cup for the perfect whipped likeness) Now whip in the egg whites and half of your brown sugar and keep whipping until you potatoes can hold the little waves shapes that the mixer makes ( about another minute or so). Take a teeny taste and see if you need the rest of your sugar or not. Remember, the nuts will add a small amount of sweetness too) Save a Small amount to sprinkle atop your dish. Crush the pecans. Spread the sweet potatoes in a glass cake pan, sprinkle thoroughly with pecans and the brown sugar. gently sprinkle nutmeg over the dish, very lightly. pop in the oven at 300 for 1/2 hour to 45 mins, until steaming hot in the center. This is a HUGE hit with EVERYONE, well.. unless they don't like sweet potatoes, or are freaked out by orange foods. ENJOY!!! Oh! And this easily feeds 6-8 or maybe even more, people, as a side dish of course. we had 6 and used about 3/4 of the pan... but we had 2 other side dishes as well.
Orange Essence Sugar Snap Peas
Ok! So that was the duck, my hubby also did some pineapple chicken breasts on the grill, thank goodness! Ha ha! Cause it was super yummy! LOL, But I will save that for the Hawaiian Luau Post! That will come later this summer, maybe in June/July when my sis IL, Bro IL and the nephews are up! The side dishes we made were all acceptable, the rice was nasty, but I don't like wild rice, and we didn't use all of the onion and the brown rice just never seems to get as soft as the white rice. But the Snap Peas were amazing, and the sweet potatoes rocked. SO here it is: lol
These are the Orange Essence Snap Peas, I thought they would be icky, but I actually REALLY liked them! It's super easy, you can use fresh or frozen, but fresh is much better. Frozen is good, but it is so easy to get them mushy on accident.
You need:
Sugar Snap Peas ( amount depends on how many people you are cooking for, use your judgement)
zest and juice from 1 half of an orange (really, just a half!)
1 T Butter (or margarine would work just fine)
Cracked salt and pepper to taste ( I didn't even bother with salt)
Directions:
Simply bring some water to a boil (just enough to cover bottom of sauce pan about 1 inch deep) boil/steam until tender, if frozen, boil/steam until heated through, but not mushy. Drain water, add butter and keep on heat, zest your orange ( that's scraping the peel gently with a serrated knife or small grate, or zester just until the white shows, you only need the orange colored part of the peel) over the peas and give a gentle toss to the pan. Now, after you have a good visual amount of the zest ( so it looks pretty, like the picture... then it will be about enough zest) then give that orange a good squeeze or three and stir it all together. Let it heat up until the butter is melted and the peas are hot then dump into a serving bowl ( or serve out of the pan and save dishes, ha ha!) Voila! Done! And they have just enough sweetness to go with the buttery flavor. SUPER YUMMY! I would have never thought of putting oranges on peas without the internet, ha ha ha!
Red Plum Glazed and Smoked Duck

Here is the Glaze for the Duck (or chicken, pork loin or chops, or maybe even a beef loin) It is slightly sweet, spicy, and smokey. It is super yummy! gives a nice crunch and zest!
Prep Time: 10 minutes
Total Time: 10 minutes
Yield: Makes about 1 1/2 cups
Ingredients:
•1 cup plum jelly
•4 cloves garlic
•1 tablespoon fresh ginger
•1 tablespoon soy sauce
•1 tablespoon fresh ground black pepper
Directions:
Place on ingredients in a food processor and blend until smooth. About 1 hour before you are done smoking the duck paint over the entire surface. Continue glazing about every 15 minutes until done.
Now we did this exactly every 15 minutes towards the end of the duck being smoked. Then we put the duck in a 450 degree oven for about 15 minutes to crisp the skin. It was Fabuloso! However, I don't like dark meat, so I just ate a piece of the skin, and a tiny piece of meat, ha ha! But everyone loved it, there was only one little short, fat leg leftover! (In case you have never had duck, they are slightly larger than a chicken, but have longer, larger wings, and teeny, tiny, short, fat legs! They look really funny without their feathers! They also have a TON of thick, nasty, fatty skin. If you are going to roast or smoke a duck, you need to take a knife or large pointed object and poke tiny little holes all over the duck to allow the fat to seep out. If you do not prick the duck, it will be, to me, inedible. The fat does not taste good like how beef fat can sometimes be flavorful, duck fat is too rich and funky tasting, ha! You should go to about.com or other websites to find tips on smoking duck, or email me and I can send you some resources. We also used a (beer) can cooker, like what most people grill or roast a chicken on. This allows the fat to run also, otherwise you will have greasy duck, lol! It took around 50 minutes per pound to smoke our fresh duck, it was juicy and tender.
Saturday, May 21, 2011
Recipes to follow
Hello all! So, this last week and a half has been a little crazy. It's been busy busy, then sick, then busy again! LOL.so I have failed to posta recipe last week, however, I will make up for it by posting our entire dinner full of recipes after tonight. I want to try them all first before I post them! Ha HA! The menu includes Smoked Plum Duck, Wild Rice with Videlia Onion, Orange scented snap Peas, and Whipped Sweet Potatoes Casserole. If anything is gross, lol i won't post it ha ha ha!
Monday, May 9, 2011
Chippy Blonde Brownies

No, I didn't pick the name, LOL and I think if I were to name them, which, ok ok I will REname them now, I would/will call them : Golden Cash Brownies sounds funny, but I put cashews in them and mmm mmm mmm! So Here is my first food blog entry! After looking through Taste of Home's Cookie Cookbook ( I LOVE Taste of Home!) I found and modified a great blondie brownie recipe! We made it tonight, not sure if the power was going to stay on and cooperate or not... so far so good! ha! We have been having a string of crazy weather, and it has been accompanied by a string of power outages! I'm pretty sure the mayonnaise will need to be thrown out if it goes through one more power outage! Ha ha! Ok , Ok , on to "brownies". By the way, I didn't know that brownies didn't have to be chocolate! LOL!
Golden Cash Brownies
15 mins Prep, 25-35 mins Bake Time
Ingredients:
6 Tablespoons Butter, softened NOT melted.
1 Cup packed brown sugar
2 eggs
1 Tsp Vanilla Extract
1 1/4 Cup All Purpose Baking Flour ( I like Wheat Montana Premium Baking Flour)
1 Tsp Baking POWDER
1/2 Tsp Salt
1 Cup semi sweet Chocolate Chips ( I like Godiva Milk Chocolate Chips) (or Hershey Mini Kisses)
1/2 Cup semi crushed or chopped Cashews
Preheat Oven to 350 degrees.
Cream sugar and butter until light and fluffy ( I use a hand mixer because I have wrist problems, but you can use a spatula or nylon mixing spoon, however you like to do it. A mixer is super fast and easier). add eggs one at a time, beating each one well. Beat in vanilla.
Whisk flour, baking powder, and salt together and add gradually while beating/mixing mixture. stir in (by hand) choc chips and nuts. The nuts are optional of course, due to allergies, but they are good! I suggest adding them. Pour into a sprayed ( i use olive oil spray, you can grease your pan however you like) You can use a cake pan or brownie pan depending on how thick you want your brownies, they don't puff up very much, so as long as you have clearance in your pan, it shouldn't bake over! You could even use cupcake or mini cupcake pans if you want them to be pre-portioned. baked at 350 for 25-35 mins depending on your pan. A knife or toothpick should be able to be inserted into middle of pan and come out clean.
These are really good alone, but super good with vanilla bean ice cream! I plan to serve them with afternoon tea, Target had these GREAT Calypso Elephant Tea Pots! Yay for Tea "Parties"! Enjoy!
Subscribe to:
Posts (Atom)

